Using Proactive Analytics
This article explains how to use the Proactive Analytics page.
Introduction
With Proactive Analytics, you receive visualizations and important information about the following:
-
Anomalies
-
Trends
-
Metric drop alert (delivery log)
The purpose of trend detection is to detect long-term trends. The time range is determined dynamically and can differ between trend s. A trend always ranges from the last turning point until yesterday.
In Proactive Analytics, individual insights are called findings.
Proactive Analytics displays a timeline of findings based on your data. Adverity updates the timeline once a day. Every finding is rated on an impact score on a scale:
-
Low
-
Medium
-
High
The impact score shows you how much attention you should pay to the displayed information.
Prerequisites
Before you read this reference, perform all of the following actions:
When you start using Proactive Analytics, create workspaces in the following way:
-
If your organization has multiple brands, create a separate workspace for each brand.
-
If your organization is a media agency with multiple clients, create a separate workspace for each client.
Managing configurations
Findings for the Proactive Analytics timeline are generated based on the customized data that you have onboarded. The data is onboarded with configurations. A configuration is a group of selected dimensions, metrics and filters which will then be processed and turned into findings displayed in the Proactive Analytics timeline.
Each finding shows the configuration based on which it was generated.
To view and manage existing configurations, follow these steps:
-
Select the workspace you work with in Adverity and then, in the , click Proactive Analytics.
-
In the top right corner if the page, click
 Configurations overview.
 -
To enable or disable a configuration, click the toggle next to it.
Disabled configurations will not be used to generate future findings. Previously generated findings associated with disabled configurations are not removed.
-
To view the configuration details, click Show configuration.
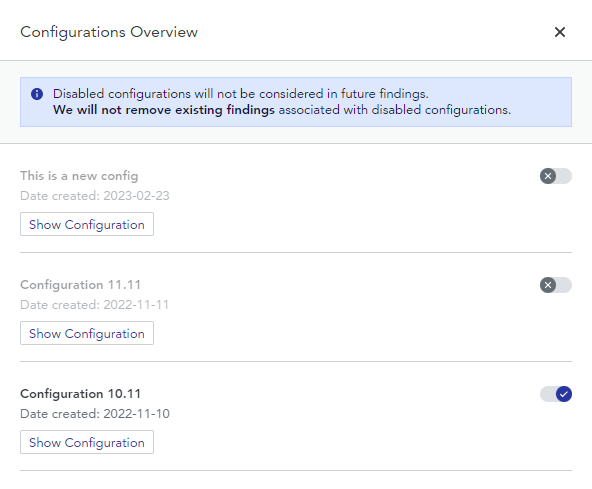
Configurations overview page.
Filtering findings of Proactive Analytics
Filtering the findings in Proactive Analytics helps you to see only the information you are interested in. By default, you can see all findings. The filtered results show findings from the last 30 days.
To filter the findings, follow these steps:
-
Select the workspace you work with in Adverity and then, in the , click Proactive Analytics.
-
Above the findings, click
 Apply filters.
 -
Use the right panel to filter the results. You can filter for the following:
-
Configurations
-
Dimensions
-
Dimension values
-
Metrics
-
-
Click Apply.